Thursday, December 26, 2013

Cafe Rio Style Sweet Pork

4 lb pork
20 oz Dr. Pepper/Coke
1 cup brown sugar
1/4 cup white sugar
2 TB ADOBO sauce
1 heaping tsp dry ground mustard
2 tsp minced Garlic
1-1 1/2 cups mild salsa/picante sauce
1 small can of chopped chilies 


Add all ingredients to the crock pot.  If the pork seems too sweet add more salsa.  Cook on low 6-8.  Shred and put on burrito with rice and black beans.  

This is April's recipe she gave me.  It is the BEST sweet pork recipe I've had!

Tuesday, October 29, 2013

3 Cheese Chicken Casserole

Saute:
1 small onion
1/2 cup green pepper
3/4 cups mushrooms
2 TBS butter

Add sauted items with:
2 cans cream of chicken
1 can cream of mushroom
1/2 tsp basil

In another bowl mix:
1 pkg 8 oz noodles cooked
3-4 cups cooked and cubed chicken
2 cups shredded cheddar cheese
1 16 oz cottage cheese
1/2 cup Parmesan cheese

Mix both bowls together (or in a large 9x13 casserole dish).  Bake uncovered at 350 degrees for 45 minutes.

*** OR PUT IT IN THE FREEZER FOR LATER!  MAKES A GREAT FREEZER MEAL***

Easy Crockpot Chicken Fajitas

Ingredients:
1 lb chicken breasts, sliced into thin strips
3 peppers (green, red and yellow) sliced into strips
1 onion sliced
1 pkg fajita seasoning
Tortillas
other toppings of your choosing - cheese, sour cream, etc

Place sliced peppers and onions on the bottom of the crockpot.  Put chicken on top of the peppers and onions.  Sprinkle seasoning on the top.  Cook on low for 6-8 hours or high for 3-4 hours.  Serve in tortialls and all the toppings of your choice.

*** Great freezer meal!  So easy to cut up and put in a bag and freeze.  Then just plop it into your crockpot for an easy and great tasting meals!  ***

Thursday, September 12, 2013

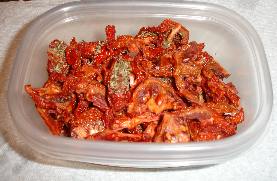
Sun-dried tomatoes


Don't know what to do with all those tomatoes?  Make sun-dried tomatoes!  They are so expensive at the store!  I made these last year and they turned out great.  I'm looking forward to having more!  I dry them and then put them in a quart freezer bag and just throw them in the freezer.  I don't put them in oil or anything and they are just great.  I used this RECIPE.


I

Step 1 - Selecting the tomatoes
It's fun to go pick your own and you can obviously get better quality tomatoes!  
At right is a picture of tomatoes from my garden - they are so much better than anything from the grocery store. And if you don't have enough, a pick-your-own farm is the place to go!  
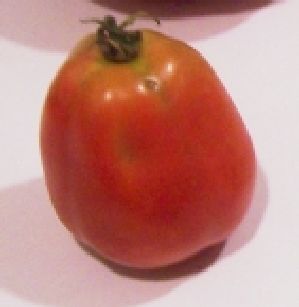
The picture at right shows the best variety of tomato to use: Roma; also called paste tomatoes.  They have fewer sides, thicker, meatier walls, and less water. And that means thicker sauce in less cooking time!
Also, you don't want mushy, bruised or rotten tomatoes!

Step 2 -  (Optional) Removing the tomato skins
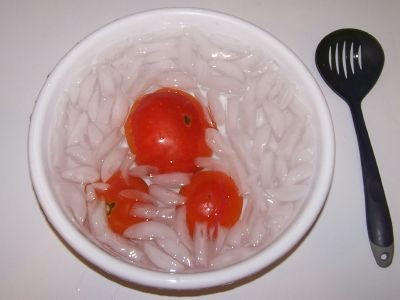
If you do not want to remove the skins, skip to step 4. This is completely optional; some people prefer them with skins, some without. The type you buy in the stores usually has the skins intact.
Here's a trick you may not know: put the tomatoes, a few at a time in a large pot of boiling water for no more than 1 minute (30 - 45 seconds is usually enough)
then....
Plunge them into a waiting bowl of ice water.
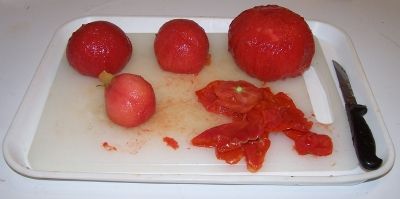
This makes the skins slide right off of the tomatoes! 


With a gentle tug, the skins should practically slide off the tomatoes. 


Step 3 - Removing bruises and tough parts, and cut in half

Cut the tomatoes in half lengthwise.
Cut out the tough part around the stem and any bruised or soft parts.
I usually then cut the tomatoes in half again, so I get four lengthwise quarters from each tomatoes. It just depends how big or small you want the final dried pieces to be. Usually they shrink to 1/4 their original size.

Step 4 - (Optional) - Remove the seeds

I generally don't bother with Roma-type tomatoes, they have so few seeds, anyway.  If I'm using regular Big Boy, beefstake tomatoes, then sometimes I do.  Just scoop them out with a spoon or with a nudge from your finger!

Step 5 - Drying the tomatoes

As I said at the beginning, you have 3 choices:
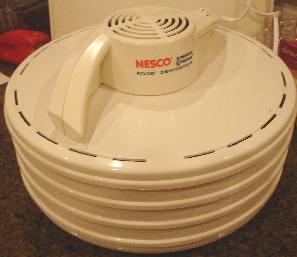
  • A Food dehydrator - which is the easiest way, and since it is designed for this purpose, yields the most consistent results. I learned this through experience! Also, those with adjustable thermostats (temperature control and a timer are best - more expensive, but, as Borat might say "very nice!" See this page for food dehydrator makes and models and ordering information.
  • An oven - everyone has one of these, so that means you need no additional equipment
  • A car (well, or truck, suv, minivan, etc.) and a very hot , sunny day.
Regardless of the drying method you use, you spread the tomato slice out on their trays and you may opt to sprinkle them with salt or dried herbs (basil, thyme and/or oregano are commonly used).
Here are the specific directions for each method:
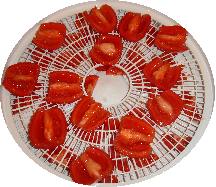
  1. Food dehydrator: Arrange the pieces on each rack so that air can circulate, preferably with the pieces not touching each other, but there's no need to become obsessive about it. Some people prefer to sprinkle the tomatoes with sea salt, kosher salt and/or some spices (typically basil). Turn the dehydrator on and enjoy the aroma.  If your food drier has a thermostat, set it for 140 degrees F. It will take 3 to 8 hours. See "how to tell when they are done" in step 7, below.
  2. Oven: preheat the oven to 150 degrees F (65 degrees C or gas mark 1).  If you don't have these settings, just use the lowest setting you've got. Arrange the tomatoes on cake racks, spread out, not touching each other. Cookie sheets will work if you don't have cake racks or screens - but you need to flip or stir the tomatoes once in a while to expose the other side of them. Some people prefer to sprinkle the tomatoes with sea salt, kosher salt and/or some spices (typically basil). Close the oven. It takes about 10 to 20 hours, but you'll need to check periodically, including rotating the shelves and moving them up or down to get even heating. If you want to speed it up, you can bump the heat up to as high as 200 degrees F ( 93 degrees C), but you'll need to watch them much more closely. See "how to tell when they are done" in step 7, below.
  3. Automobile and a hot sunny day: It sounds strange, but the same stifling hot car that burns your legs makes an excellent food dryer.  Spread the tomato slices out on shallow trays (they work better than cookie sheets, since you don't need to worry about leaking juice!).  Cover them loosely with cheesecloth to keep any potential for bugs to come in contact.  Put the trays on the dashboard of your car and roll all the windows up and park in the sunniest spot you've got. It's best to start in the morning and let it go to sunset.  It may take 2 days - bring the tomatoes in the house overnight. Some people prefer to sprinkle the tomatoes with sea salt, kosher salt and/or some spices (typically basil).  but you'll need to check periodically. See "how to tell when they are done" in step 7, below. Note to Al Gore: If you dry tomatoes in one of your limousines or private jet, it might count as a part of your carbon offset! :)

Step 6 - How to tell when they're done

The amount of time it takes depends on the water content of the tomatoes, the thickness of the slices, and how well the air is able to circulate around them. When done, the tomatoes should be flexible, like a raisin from a fresh bag; not brittle. Most describe them as leathery with a deep red color, without free water or a tacky feeling.

Step 7 - Cool, then Fill the Zipper-type bags
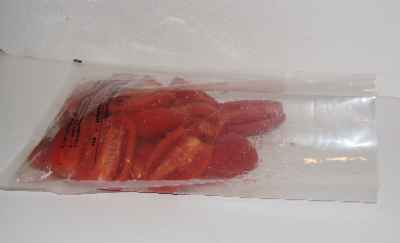
Let the tomatoes cool to room temperature (about 20 to 30 minutes), then fill the bags. Don't overfill the bags, leave a little room for expansion. Do try to avoid leaving any air pockets!   A vacuum bag is shown at left, but you can use ziploc (or similar) bags, shown below.  But be sure to squeeze out the extra air (below left is before, below right is after squeezing out the excess air).


Friday, August 9, 2013

French dip

1 Beef Rump Roast
1 pkg Au Jus seasoning packet (in gravy mix section of store)
1 can French Onion Soup
3 cups water
salt and pepper to taste
4 tablespoons worcestershire sauce
chopped garlic (1 tsp of pre-chopped bottled kind)

Put all ingredients in crock pot and cook on low for about 8 hours.  Shred with a fork.

***  I LOVED adding some carmelized onions after it was done and shredded.  Another tip - put it on a roll, put provolone cheese on top of the meat and bake in the oven for 3-5 minutes at 350 degrees.  DELICIOUS!  ***  We had this from our freezer meal group and was awesome!

Wednesday, July 31, 2013

Smothered Chile Colorado Burritos

recipe from chef in training

INGREDIENTS

INSTRUCTIONS

  1. Put beef pieces into crock pot. Top with crushed bouillon cubes and enchilada sauce. Cook on low for 7-8 hours, or until meat is very tender.
  2. When beef is done (very tender and flakes off when stirred), taste and add more salt, if desired.
  3. Make sure beans are warmed through. You can use canned refried beans or the recipe I provided you with.
  4. Smear about 2 heaping spoons worth of beans on to the center of each tortilla. Add about 1/2 cup of beef, give or take, and roll into a burrito.
  5. Place burritos into a greased 9x13 baking pan until it fills the pan. Pour some of extra sauce over the tops of the burritos to smother them. Place cheese on top. 
  6. Broil until cheese becomes bubbly, approx. 2-4 minutes.
  7. This recipe makes about 5-7 burritos depending on how big you make them.
This is delicious! Gage loves them! I have even made extra and frozen them for my freezer meal group and to have more yummy burritos on hand. 

If I premade the meal, I will let it thaw and then cook on 350 for about 25-30 minutes until cheese is melted and burritos are heated through.

ENJOY!

Monday, July 15, 2013

Teriyaki Chicken Bowls (Crockpot)

6 boneless skinless chicken thighs or breasts (about 2 ½ pounds)
3/4 cup sugar
3/4 cup low-sodium soy sauce
6 tablespoons cider vinegar
3/4 teaspoon ground ginger
3/4 teaspoon minced garlic
1/4 teaspoon pepper
4 1/2 teaspoons cornstarch
4 1/2 teaspoons cold water

Place chicken into crock pot. Mix together sugar, soy sauce, vinegar, ginger, garlic, pepper. Pour
over chicken and cook on high for 3-4 hours. Low 5-6 hours. Freezes great. Serve with rice and
steamed veggies to make Teriyaki Bowls.

Friday, June 21, 2013

Missy's Rolls

1/3 cup water
1/4 cup sugar
1 T. yeast
Let stand 5 minutes - can add 2 T. butter

3/4 tsp. salt
2 eggs
4 1/2 cups flour (enough to not be sticky)

Raise 1/2 hour and then make into rolls.  Then let the rolls raise.  And then bake at 375 (put in oven while preheating for 17 minutes) for 15-20 minutes.

Honey Oatmeal Bread

This is Missy's recipe.  She is a wonderful baker!

4 cups boiling water
2 cups oatmeal
1 cup honey
5 tsp. salt
4 T. butter
1/2 cup warm water
3 T. yeast
9-12 cups flour

Mix boiling water, oats, honey, salt, and butter and let sit for 30 minutes.  Mix warm water and yeast let sit about 5 minutes until yeast rises to the top.  Add to oat mixture.  Slowly add in flour about 4 cups at a time.  Dough should still be slightly sticky and still able to handle.  Put in oiled bowl and let rise for about an hour.

Punch down and shape into 4 loaves.  Let rise for about an hour (until dough is about an inch above the pan).  Bake at 350 for 30 minutes.

Fondue

Another one of Juanita's (Paul's mother) favorites.

Caramel Fondue

1/2 cup margarine
2 cups brown sugar
1 cup corn syrup
1 can sweetened condensed milk
1 tsp vanilla

Warm and dissolve over medium heat until almost boiling (add vanilla at the end).

Chocolate Fondue
1 cup chocolate chips
1 cup marshmallows
1/2 cup canned milk

Mix and heat over low heat.

Missy's Chocolate Fondue
2 cups semi-sweet chocolate chips
1 can sweetened condensed milk
1 jar marshmellow cream
1/2 cup milk
1 tsp. vanilla
Heat just until melted, whisk until smooth


Coconut Curry Cashew Popcorn

Another one of Juanita's favorites!

10 cups popped popcorn
2 cups cashews
1/2 cup flaked coconut
1/2 cup butter
1/2 cup sugar
1/4 cup honey
1 T. mild curry powder
1/2 tsp. baking soda

Preheat oven to 300 degrees.  Place popcorn, cashews and coconut in a large bowl; set aside.  Heat butter, sugar, and honey in a medium saucepan.  Stir mixture over medium heat until it begins to boil. Boil 2 minutes without stirring.  Remove from heat and stir in curry powder and baking soda (mixture will foam). Pour syrup over popcorn mixture in bowl and stir until evenly coated.

Pour mixture onto large rimmed baking sheet or roasting pan lined with foil and sprayed with nonstick spray.  Bake 30 minutes, stirring twice during baking time.  Stir mixture a few times as it cools on baking sheet.  Store in an airtight container.

Hot Artichoke Dip

I found this in Juanita's cookbook, it comes from Julia (Paul's sister).  They say it's really good.

1 cup mayo
1 cup grated Parmesan cheese
2 cups Mozzarella cheese, grated
2- 6 1/2 oz. jars of artichoke hearts
1 1/2 tsp. garlic powder

optional:  1 pkg cream cheese and green chilies

Mix all ingredients and bake at 350 for 30 min.  After done, sprinkle with Paprika.

Melissa's Spinach Salad

We had this salad last night and everyone loved it!  I think the fresh basil was the secret ingredient.

Salad
Spinach (can use 1/2 Romaine lettuce), in bite sizes
Fruit, in bite sizes (raspberries, strawberries, apple, pear- any combination of a couple fruits)
Fresh Basil, chopped
Pinenuts, 1/2 cup
Cheese, optional (Feta or Parmesan)

Poppy Seed Dressing
1/4 cup chopped onion
1 cup olive oil
3/4 cup white sugar
1 1/2 T. poppy seeds
1 tsp. salt
1/3 cup apple cider vinegar

Thursday, June 20, 2013

Corn Dogs

This recipe comes from Paul's mother, Juanita.  My eyes got big when I found it in her recipe box, because I LOVE homemade corn dogs.

1 cup flour
3/4 cups cornmeal
2 T. sugar
1 T. dry mustard
2 tsp. baking powder
2 T. crisco oil
1 cup milk
1 egg

2 packages hotdogs

Mix all ingredients (except hotdogs) in deep narrow bowl. Dip hotdogs on a stick in mixture.  Then deep fat fry (350 degree oil) and drain on paper towels.

Friday, June 14, 2013

Garlic Butter Spread

Tara and I had this from our freezer meal group and it was to DIE FOR!  So delicious!  I could have eaten the whole load of french bread!


1 cup real butter, softened
1 tablespoon minced garlic
1/4 cup grated Parmesan cheese
1 tablespoon garlic powder
1 teaspoon Italian seasoning
Mix all the herbs and seasonings into the softened butter.

***  I think this is enough for 2 loafs.  So cut the recipe in half if making only one loaf.  Beware...you may just devour all the bread yourself!  ****

Saturday, June 1, 2013

Holy Yum Chicken

Holy Yum Chicken


Yield: 2 servings | Prep Time: 5 minutes | Cook Time: 40 minutes

Ingredients:

1 1/2 – 2 pounds boneless, skinless, chicken thighs (most of the fat cut and discarded) 
1/2 cup Dijon mustard (must be Dijon mustard, no substitutes)
1/4 cup pure maple syrup (again, no substitutes. No fake Aunt Jemima stuff)
1 tbsp. rice wine vinegar
1/4 tsp. salt
1/4 tsp. ground black pepper
1 tbsp. cornstarch
2 tsp. fresh rosemary for garnish

Instructions:

  1. Preheat oven to 450 degrees. Line a 8×8″ oven-proof pan with 2 layers of tin foil.
  2. In small bowl, whisk together Dijon mustard, maple syrup, rice wine vinegar, salt and pepper.
  3. Place the chicken thighs in the foil layered pan then pour the mixture on top of it. Turn the chicken around in the sauce to make sure it gets all coated.
  4. Bake, uncovered, for 40 minutes. (if you use chicken breast, check after 20 or 25 minutes)
  5. Remove from oven and let chicken sit for 5 minutes then transfer to a plate. Do NOT discard the liquid.
  6. Immediately after plating chicken, whisk in the 1 tbsp. of cornstarch into the liquid in the pan. You’ll create a nice, thick sauce to drizzle over your chicken. You need to do cornstarch mixing immediately because the liquid needs to be hot in order for it to thicken properly. If it’s still not thickening after 1 tbsp., you can add a little more.
  7. Sprinkle rosemary on top before serving.
  8. Serve with rice or potatoes or vegetables.

Sunday, May 12, 2013

Suzanne Kloepfer's Cookies (Neiman Marcus cookie recipe)


Mom makes the best cookies!  I finally got the recipe from her.

2 cups (real) butter
2 cups white sugar
2 cups brown sugar
4 eggs
2 t. vanilla
1 t. Salt
2 t. baking soda
2 t. baking powder
4 cups flour
5 cups oat meal (measure, then blend)
1/2 pkg. Score Bits
1 1/2 pkg. milk chocolate chips or big Hershey bar cut up.
 
Eat first day or freeze.
 
Bake 350 degrees for 10 minutes.  Do not over bake.
 
If they are frozen, sometimes I bake them for 11 min.  They look a bit under baked, but when they cool, they are just right - a bit soft in the middle.

note from mom: A few times I have put Score Bits in it.  Sometimes I have put some butterscotch chips in with the choc. chips, but most of the time, I just use semi-sweet choc. chips, because that is what is in the cupboard.

Friday, May 3, 2013

Ice Cream Sandwiches

 This recipe comes from Williams Sonoma.  Here are a couple recipes below to make your own icecream sandwiches.


Blondie Cookie Ingredients:
·       2 1/2 cups all-purpose flour
·       1 tsp. baking soda
·       3/4 tsp. salt
·       16 Tbs. (2 sticks) unsalted butter, at room temperature1 cup firmly packed light brown sugar
·       1/2 cup granulated sugar
·        2 eggs
·        2 tsp. vanilla extract
·        15 scoops of your favorite ice cream, softened

Directions:
Be sure an adult is nearby to help.

Preheat an oven to 350°F. Spray a baking sheet with nonstick cooking spray and line with parchment paper, allowing the parchment to hang over the long sides of the pan.

Over a sheet of waxed paper, sift together the flour, baking soda and salt. Set aside.

In the bowl of an electric mixer fitted with the flat beater, beat the butter on medium-low speed until smooth, about 30 seconds. Add the brown and granulated sugars, increase the speed to medium and beat until slightly fluffy, about 1 minute, stopping the mixer occasionally to scrape down the sides of the bowl. Add the eggs one at a time, beating well after each addition, then beat in the vanilla, stopping the mixer occasionally to scrape down the sides of the bowl.

Reduce the speed to low, gradually add the flour mixture and beat until just combined. Shape the dough into a rectangle and cover with plastic wrap. Refrigerate until firm, at least 2 hours or up to 2 days.

Using your fingertips or a small rolling pin, evenly press or roll out the dough so it just fits in the prepared pan. Bake until the blondie is golden brown, 13 to 15 minutes. Transfer the pan to a wire rack and let cool for at least 1 hour.

Remove the blondie from the pan by lifting the overhanging edges of the parchment. Transfer the blondie, still on the parchment, to a work surface. Using the ice cream sandwich molds, cut out 10 of each shape. 


This is my first attempt, I need a little practice!
Brownie Cookie Ingredients:
·         3/4 cup all-purpose flour
·         1/4 cup cocoa powder
·         10 Tbs. (1 1/4 sticks) unsalted butter, cut into
  1/2-inch pieces
·         4 oz. unsweetened chocolate, cut into pieces
·         1 1/4 cups sugar
·         1 tsp. salt
·         3 eggs
·         2 tsp. vanilla extract
·         9 scoops of your favorite ice cream, softened
Directions:
Be sure an adult is nearby to help.

Preheat an oven to 375°F. Line an 11-by-17-inch jelly roll pan with parchment paper.

Over a sheet of waxed paper, sift together the flour and cocoa powder. Set aside.

In a heatproof bowl set over but not touching barely simmering water in a saucepan, combine the butter and chocolate. Heat, stirring often, until melted, about 4 minutes. Remove the bowl from the heat and stir in the sugar and salt. Add the eggs and vanilla and stir until well blended. Sprinkle the flour mixture over the chocolate mixture and stir just until blended.

Pour the batter into the prepared pan and spread evenly. Bake until a toothpick inserted into the center of the brownie comes out clean, 8 to 10 minutes. Transfer the pan to a wire rack and let cool for at least 1 hour. Using the ice cream sandwich molds, cut out 6 of each shape. 

Monday, April 29, 2013

Slow Cooker Nacho Chicken Soup


I just received this new cookbook, Soup's On as a belated Christmas gift (thanks Mom).  I have tried this soup and thought it was very delicious.  I doubled the recipe and used only half of the green chiles.  I didn't have sour cream on hand, so I threw in 8 oz. of cream cheese!

Slow Cooker Nacho Chicken Soup

1½ lbs. boneless chicken breasts or thighs
2 (14 oz.) cans chicken broth 
2 (7 oz.) cans diced green chiles
(substitute 1 can with jalapeños)
1 pkg taco seasoning
1 can condensed cream of chicken soup
1 can black beans, drained & rinsed
1 can corn, drained
1 cup sour cream 
½ cup chopped fresh cilantro, divided
2 cups crushed nacho-flavored chips (Nacho Doritos)


1. Place about a 1/2 pound of boneless chicken breast or thighs, in the pot. 
2. Add broth, chiles, a package of taco seasoning, and cream of chicken soup.
3. Cook on high 3-4 hours, or on low 6-8 hours. 
4. About a half hour before serving, use a large slotted spoon to remove the chicken from the pot and place in a medium-size bowl to cool slightly.
5. While it's cooling, stir sour cream, cilantro, crushed tortilla chips, cheddar, beans and corn into the soup.
6. With two large forks, shred the chicken. Return the chicken into the pot and stir well before serving. 
6. Let each guest customize their bowl with options such as chopped cilantro, sliced olives, chopped tomatoes or salsa, chopped red or green peppers, diced avocadoes or guacamole, tortilla chips, grated cheese, shredded lettuce, and hot sauce.

- "Soup's On!" by Valerie Phillips

Friday, April 19, 2013

Crazy Good Brownies

As requested by Tami...
These are delicious brownies! Taken from the Bountiful 5th Ward Neighborhood Cookbook...

1 C brown sugar
1 C sugar
1 C oil
2 tsp. vanilla
4 eggs

1 tsp. salt
8 T. cocoa
1 1/2 C flour
1 C shopped, toasted pecans (we haven't ever added the pecans... but I'm sure it is yummy!(

Preheat oven to 350 degrees.

Mix sugars, oil, vanilla and eggs. Add salt, cocoa, flour and nuts. Prepare a cake pan, grease and flour and then pour batter into it. Bake for ~40-45 minutes (printed recipe said 25 minutes but they were too runny but maybe that is because we didn't add nuts?). Just check and take note how long - we bake them in a 9X13 pan and it took 45 minutes.

ENJOY!

Thursday, April 11, 2013

Peanut Butter Cup Cookies

Watch out...these are addicting and will disappear fast!  They are super yummy and an instant hit anywhere you take them.

Peanut Butter Cup Cookies 2
1 cup butter (2 sticks) room temperature
2/3 cup peanut butter (crunchy or creamy – I like crunchy)
1 cup sugar
1 cup brown sugar
2 eggs
2 teaspoons vanilla
2  2/3 cup flour
2 teaspoons soda
1 teaspoon salt
48 miniature Reese’s peanut butter cups, unwrapped
Cream butter, peanut butter, sugar, brown sugar, eggs and vanilla together until smooth. Combine flour, soda and salt and add to butter mixture.
Form dough into 1-inch balls and place in mini muffin pan (leave in balls; do not press down.)
Bake at 350 degrees for 10-12 minutes.  Just cook until they start to brown, and then take them out.   Immediately press a miniature peanut butter cup into the cookie until top is even with the top of the cookie.  Let cookies cool in pan for at least 10 minutes before transferring.

(Or if you have a favorite peanut butter cookie recipe, use that instead of the above.)  

This recipe is from The Sister's Cafe website.  HERE is the direct link for the recipe.

Lemon Chicken Romano

Looking for something to make with those lemons mom gave you from Arizona?   I made this the other night and it was delicious!
lemon chicken romano2

Ingredients
  • 2 (8 oz) boneless, skinless chicken breasts, trimmed, halved horizontally*, and pounded to 1/2-inch thick
  • 2 oz shredded Whole Milk Mozzarella cheese (1/2 cup)
  • 2 oz shredded Provolone cheese (1/2 cup)
  • 1 large egg
  • 1 Tbsp all-purpose flour
  • 1/2 cup Panko bread crumbs
  • 1 1/2 oz finely shredded Romano cheese (1/2 cup)
  • 1 Tbsp chopped fresh oregano
  • Zest of 1 lemon (2 tsp)
  • 1/2 tsp garlic powder
  • Salt and freshly ground black pepper
  • 2 1/2 Tbsp vegetable oil
  • 2 1/2 Tbsp extra virgin olive oil
  • Lemon slices or wedges for serving (you can just use the one that was zested)
Directions
  • Preheat oven to 350 degrees. Sprinkle each side of the chicken cutlet lightly with salt (about 1/16 tsp per each side), let stand at room temperature 20 minutes. Combine Mozzarella and Provolone cheese in a bowl, set aside.
  • In a shallow dish, whisk together flour and egg until smooth. In a separate shallow dish, toss together Panko bread crumbs, Romano cheese, oregano, lemon zest, garlic powder and 1/4 tsp pepper. Pat chicken dry with paper towels. Working with 1 chicken cutlet at a time, dredge chicken in egg mixture coating both sides and allowing excess to run off, then immediately transfer to Romano mixture and coat both sides with mixture, while pressing gently to allow crumbs to adhere. Transfer chicken to a plate and repeat process with remaining chicken cutlets. Pour 2 1/2 Tbsp olive oil and vegetable oil into a 10-inch non-stick skillet and heat over medium-high heat. Once oil is hot, add 2 coated chicken cutlets and fry without moving them until bottom is crispy and golden brown, about 2 minutes, then using metal tongs rotate to opposite side and cook until golden brown, about 2 minutes longer. Transfer fried chicken to a large plate lined with paper towels to drain. Repeat process with remaining 2 pieces of chicken.
  • Place cutlets on rimmed baking sheet, sprinkle tops with Mozzaralle cheese mixture and transfer to preheated oven to bake until internal temperature registers 165 degrees on an instant read thermometor, about 12 minutes (you can broil during the last 1 - 2 minutes if desired). Remove from oven and garnish with lemon slices or wedges, serve warm. Squeeze fresh lemon juice from lemon slices over chicken just before enjoying.
  • *freeze chicken breasts for 15 minutes to help slice easier, then lye breast flat and trim into two pieces through the thickness of the breast.
  • The recipe came from Cooking Classy website.  You can find the link HERE.

Sunday, March 24, 2013

smaller batch whole wheat bread


Perfect 2 loaf recipe. This is the Set For Life recipe- a little tweaked to make fluffier moister bread. Smaller batch.

In mixer bowl mix together:

3 cups whole wheat flour
1 TB yeast
1/4 cup gluten
2 TB dough enhancer
6 TB powdered milk

Add:

2 TB lemon juice
2 cups hot water
* cover bowl with rag and let it sponge for 10 minutes

Turn on oven to 170 degrees

Add:

3 TB honey
3 TB oil
2 tsp salt

Turn on mixer with dough hook
Add 3 more cups whole wheat flour and let machine knead dough for 10 minutes

Divide dough into 2 equal balls, form into 2 loaves and place in greased bread pans

Place the bread pans with loaves in the oven covered with rag and turn off your oven. Let them rise to almost double- about 25 minutes.

Take off rag and leave them in the oven. Do not take them out. Set your oven to bake 350 degrees and set your timer for 33-35 minutes. When the timer goes off, your bread is done. Take it out of the pans immediately and let them cool on cookie rack... and just like that, you will be a bread super star.

Monday, February 25, 2013

Pita Bread

I made my own pita bread using the following recipe, which I found at allrecipes.com - here.  It's a simple recipe, just a little time consuming.


  1. Place all ingredients in bread pan of your bread machine, select Dough setting and start. When dough has risen long enough, machine will beep.
  2. Turn dough onto a lightly floured surface. Gently roll and stretch dough into a 12 inch rope. With a sharp knife, divide dough into 8 pieces. Roll each into a smooth ball. With a rolling pin, roll each ball into a 6 to 7 inch circle. Set aside on a lightly floured countertop. cover with a towel. Let pitas rise about 30 minutes until slightly puffy.
  3. Preheat oven to 500 degrees F (260 degrees C). Place 2 or 3 pitas on a wire cake rack. Place cake rack directly on oven rack. Bake pitas 4 to 5 minutes until puffed and tops begin to brown. Remove from oven and immediately place pitas in a sealed brown paper bag or cover them with a damp kitchen towel until soft. Once pitas a softened, either cut in half or split top edge for half or whole pitas. They can be stored in a plastic bag in the refrigerator for several days or in the freezer for 1 or 2 months.