Ingredients:
8 oz Catalina dressing
1 pkg dry onion soup mix
1 lb can whole berry cranberry sauce
4 chicken breasts
To Freeze:
Mix together everything but chicken. Place sauce and chicken in a freezer bag. Freeze in freezer.
Serving day:
Place in crockpot for 5-6 hours on low. Whalaa!
If you want to make multiples at one time....I have doubled the recipe and then actually made it into 3 freezer meals since I'm trying to make it the size of what my family would eat. I also use one can of whole berry cranberry sauce and then one can of just the cranberry sauce so there aren't too many cranberries. Great meal to make once the salad dressing goes on sale. You can get the dressing on a good deal for about $1.50/bottle.

Showing posts with label freezer. Show all posts
Showing posts with label freezer. Show all posts
Sunday, August 3, 2014


Tuesday, October 29, 2013
3 Cheese Chicken Casserole
Saute:
1 small onion
1/2 cup green pepper
3/4 cups mushrooms
2 TBS butter
Add sauted items with:
2 cans cream of chicken
1 can cream of mushroom
1/2 tsp basil
In another bowl mix:
1 pkg 8 oz noodles cooked
3-4 cups cooked and cubed chicken
2 cups shredded cheddar cheese
1 16 oz cottage cheese
1/2 cup Parmesan cheese
Mix both bowls together (or in a large 9x13 casserole dish). Bake uncovered at 350 degrees for 45 minutes.
*** OR PUT IT IN THE FREEZER FOR LATER! MAKES A GREAT FREEZER MEAL***
Easy Crockpot Chicken Fajitas
Ingredients:
1 lb chicken breasts, sliced into thin strips
3 peppers (green, red and yellow) sliced into strips
1 onion sliced
1 pkg fajita seasoning
Tortillas
other toppings of your choosing - cheese, sour cream, etc
Place sliced peppers and onions on the bottom of the crockpot. Put chicken on top of the peppers and onions. Sprinkle seasoning on the top. Cook on low for 6-8 hours or high for 3-4 hours. Serve in tortialls and all the toppings of your choice.
*** Great freezer meal! So easy to cut up and put in a bag and freeze. Then just plop it into your crockpot for an easy and great tasting meals! ***
Thursday, September 12, 2013
Sun-dried tomatoes
Don't know what to do with all those tomatoes? Make sun-dried tomatoes! They are so expensive at the store! I made these last year and they turned out great. I'm looking forward to having more! I dry them and then put them in a quart freezer bag and just throw them in the freezer. I don't put them in oil or anything and they are just great. I used this RECIPE.
I
Step 1 - Selecting the tomatoes
It's fun to go pick your own and you can obviously get better quality tomatoes!
At right is a picture of tomatoes from my garden - they are so much better than anything from the grocery store. And if you don't have enough, a pick-your-own farm is the place to go!
 The picture at right shows the best variety of tomato to use: Roma; also called paste tomatoes. They have fewer sides, thicker, meatier walls, and less water. And that means thicker sauce in less cooking time!
Also, you don't want mushy, bruised or rotten tomatoes!
Step 2 - (Optional) Removing the tomato skins
 If you do not want to remove the skins, skip to step 4. This is completely optional; some people prefer them with skins, some without. The type you buy in the stores usually has the skins intact.
Here's a trick you may not know: put the tomatoes, a few at a time in a large pot of boiling water for no more than 1 minute (30 - 45 seconds is usually enough)
then....
Plunge them into a waiting bowl of ice water.
This makes the skins slide right off of the tomatoes!
With a gentle tug, the skins should practically slide off the tomatoes.
 Step 3 - Removing bruises and tough parts, and cut in half
Cut the tomatoes in half lengthwise.
Cut out the tough part around the stem and any bruised or soft parts.
I usually then cut the tomatoes in half again, so I get four lengthwise quarters from each tomatoes. It just depends how big or small you want the final dried pieces to be. Usually they shrink to 1/4 their original size.
 Step 4 - (Optional) - Remove the seeds
I generally don't bother with Roma-type tomatoes, they have so few seeds, anyway. If I'm using regular Big Boy, beefstake tomatoes, then sometimes I do. Just scoop them out with a spoon or with a nudge from your finger!
Step 5 - Drying the tomatoes
As I said at the beginning, you have 3 choices:
- A Food dehydrator - which is the easiest way, and since it is designed for this purpose, yields the most consistent results. I learned this through experience! Also, those with adjustable thermostats (temperature control and a timer are best - more expensive, but, as Borat might say "very nice!" See this page for food dehydrator makes and models and ordering information.
- An oven - everyone has one of these, so that means you need no additional equipment
- A car (well, or truck, suv, minivan, etc.) and a very hot , sunny day.
Regardless of the drying method you use, you spread the tomato slice out on their trays and you may opt to sprinkle them with salt or dried herbs (basil, thyme and/or oregano are commonly used).
Here are the specific directions for each method:
- Food dehydrator: Arrange the pieces on each rack so that air can circulate, preferably with the pieces not touching each other, but there's no need to become obsessive about it. Some people prefer to sprinkle the tomatoes with sea salt, kosher salt and/or some spices (typically basil). Turn the dehydrator on and enjoy the aroma. If your food drier has a thermostat, set it for 140 degrees F. It will take 3 to 8 hours. See "how to tell when they are done" in step 7, below.
- Oven: preheat the oven to 150 degrees F (65 degrees C or gas mark 1). If you don't have these settings, just use the lowest setting you've got. Arrange the tomatoes on cake racks, spread out, not touching each other. Cookie sheets will work if you don't have cake racks or screens - but you need to flip or stir the tomatoes once in a while to expose the other side of them. Some people prefer to sprinkle the tomatoes with sea salt, kosher salt and/or some spices (typically basil). Close the oven. It takes about 10 to 20 hours, but you'll need to check periodically, including rotating the shelves and moving them up or down to get even heating. If you want to speed it up, you can bump the heat up to as high as 200 degrees F ( 93 degrees C), but you'll need to watch them much more closely. See "how to tell when they are done" in step 7, below.
- Automobile and a hot sunny day: It sounds strange, but the same stifling hot car that burns your legs makes an excellent food dryer. Spread the tomato slices out on shallow trays (they work better than cookie sheets, since you don't need to worry about leaking juice!). Cover them loosely with cheesecloth to keep any potential for bugs to come in contact. Put the trays on the dashboard of your car and roll all the windows up and park in the sunniest spot you've got. It's best to start in the morning and let it go to sunset. It may take 2 days - bring the tomatoes in the house overnight. Some people prefer to sprinkle the tomatoes with sea salt, kosher salt and/or some spices (typically basil). but you'll need to check periodically. See "how to tell when they are done" in step 7, below. Note to Al Gore: If you dry tomatoes in one of your limousines or private jet, it might count as a part of your carbon offset! :)
Step 6 - How to tell when they're done
The amount of time it takes depends on the water content of the tomatoes, the thickness of the slices, and how well the air is able to circulate around them. When done, the tomatoes should be flexible, like a raisin from a fresh bag; not brittle. Most describe them as leathery with a deep red color, without free water or a tacky feeling.
Step 7 - Cool, then Fill the Zipper-type bags
Let the tomatoes cool to room temperature (about 20 to 30 minutes), then fill the bags. Don't overfill the bags, leave a little room for expansion. Do try to avoid leaving any air pockets! A vacuum bag is shown at left, but you can use ziploc (or similar) bags, shown below. But be sure to squeeze out the extra air (below left is before, below right is after squeezing out the excess air).
Sunday, April 24, 2011
Ultimate Beef Stroganoff
You all know Chad's aversion to mushrooms. But since stroganoff is one of his favorite meals, I have tried over the years to make a decent version of it. This recipe is our all-time favorite. We had it for Easter dinner today, in fact. This stroganoff is one way to Chad's heart. He loves it! And I love that it is a crockpot meal...so easy!

The Ultimate Beef Stroganoff
2-3 pounds stew meat (or a 3-pound chuck roast, cubed)
1 teaspoon salt
1/4 teaspoon black pepper
1 medium yellow onion, diced
¼ teaspoon garlic salt
1 tablespoon Worcestershire sauce
1 ½ cups beef broth or stock
1 tablespoon ketchup
1/3 cup flour
6-7 tablespoons apple juice or water
4-8 ounces sliced mushrooms (I obviously leave these out and it is fantastic without them)
1/2 cup light or regular sour cream
Place the stew meat, salt, pepper and onion in the slow cooker. Stir to distribute the seasonings and onion. In a small bowl, combine the garlic salt, Worcestershrie sauce, beef broth and ketchup. Pour over the meat. Cook for 7-9 hours on low or 4-5 hours on high. About 30 minutes before serving, combine the flour and apple juice in a small bowl, whisking vigorously to combine well. The roux should be thick but still pourable so add a tablespoon of apple juice or water at a time to thin, if needed. Pour the flour mixture into the slow cooker, whisking quickly to mix in the roux with the stew meat and juices and to avoid lumps. Add the mushrooms and stir. Cook on high for 30 minutes. Stir in ½ cup sour cream right before serving. Serve over pasta, rice or baked potatoes.
*Freezable Meal: The leftovers of the stroganoff can be frozen. I store the leftovers in a freezer-safe container and then thaw in the refrigerator (usually takes about a day) and reheat over medium-low heat in a saucepan on the stove.
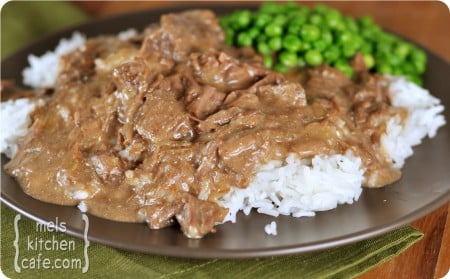
Original recipe found at Mel's Kitchen Cafe
The Ultimate Beef Stroganoff
2-3 pounds stew meat (or a 3-pound chuck roast, cubed)
1 teaspoon salt
1/4 teaspoon black pepper
1 medium yellow onion, diced
¼ teaspoon garlic salt
1 tablespoon Worcestershire sauce
1 ½ cups beef broth or stock
1 tablespoon ketchup
1/3 cup flour
6-7 tablespoons apple juice or water
4-8 ounces sliced mushrooms (I obviously leave these out and it is fantastic without them)
1/2 cup light or regular sour cream
Place the stew meat, salt, pepper and onion in the slow cooker. Stir to distribute the seasonings and onion. In a small bowl, combine the garlic salt, Worcestershrie sauce, beef broth and ketchup. Pour over the meat. Cook for 7-9 hours on low or 4-5 hours on high. About 30 minutes before serving, combine the flour and apple juice in a small bowl, whisking vigorously to combine well. The roux should be thick but still pourable so add a tablespoon of apple juice or water at a time to thin, if needed. Pour the flour mixture into the slow cooker, whisking quickly to mix in the roux with the stew meat and juices and to avoid lumps. Add the mushrooms and stir. Cook on high for 30 minutes. Stir in ½ cup sour cream right before serving. Serve over pasta, rice or baked potatoes.
*Freezable Meal: The leftovers of the stroganoff can be frozen. I store the leftovers in a freezer-safe container and then thaw in the refrigerator (usually takes about a day) and reheat over medium-low heat in a saucepan on the stove.
Monday, January 31, 2011
Linguine with Italian Turkey Meatballs

*This was really really yummy. It made a lot of extra meatballs- enough for another meal! The leftover meatballs are in the freezer ready to be cooked. So good. Chay loved them. Thumbs up on that one.
Linguine with Italian Turkey Meatballs
Recipe adapted by Our Best Bites from Domestication in Progress
Meatballs
1 lb. extra-lean ground turkey
2 oz. pancetta or 3 strips lean bacon (not maple or brown sugar), finely diced
1 small yellow onion, finely diced
1/2 c. freshly grated Romano cheese
1/4 c. fresh flat leaf (Italian) parsley
1/4 c. plain bread crumbs (I used panko bread crumbs)
1/4 c. chopped sun-dried or oven-roasted tomatoes (I just used diced tomatoes)
2 eggs, lightly beaten
3/4 tsp. kosher salt
3/4 tsp. freshly ground black pepper
Sauce
2 tsp. extra-virgin olive oil
1 28-oz. can diced tomatoes
4 garlic cloves, minced or pressed
1/4 c. chopped fresh flat-leaf parsley
1 6-oz. can tomato paste
6 oz. water (just use the tomato paste can to measure the water)
1/2 tsp. Kosher salt
1/2 tsp. freshly ground black pepper
1/2 tsp. dried basil
Linguine noodles- we used angel hair pasta
Preheat the oven to 450 and line a baking sheet with parchment or aluminum foil. In a large skillet, cook the chopped bacon or pancetta with the minced onion and garlic until the meat is crispy and the onions and garlic are tender and fragrant. Set aside and allow to cool. Combine the remaining meatball ingredients and then add the bacon/onion/garlic mixture. Shape scant tablespoons into balls and place them on the prepared baking sheet. Place the baking sheet in the oven for 20 minutes or until the meatballs are golden brown.
While the meatballs are cooking, bring a large pot of salted water to a boil for the pasta. In the same skillet used to cook the bacon, heat about 2 teaspoons of olive oil over medium heat and cook the garlic for 1-2 minutes or until it's fragrant. Add the remaining sauce ingredients and simmer until the meatballs are done. Transfer the meatballs to the sauce and serve over hot linguine noodles. Makes 8 servings.
Tuesday, July 27, 2010
Chili #2
I don't know the real name of this chili - I just know that during the chili cook-off at a family reunion, this one was labeled #2 (for voting purposes). It happened to be the chili that Paul's mother, Juanita, made.
I called her for the recipe. She gave me a good idea of the basics ingredients, but it sounds like she just throws it together and it is a little different each time she makes it according to her creativity that day.
ground pork
2-3 garlic gloves, minced
1 chopped onion
28 oz can stew tomatoes and 14 oz can of stewed tomatoes, blend them in blender (I'm guessing the ounces - it is a big one and a smaller one)
1 fresh jalepeno finely chopped, seeds removed
1 jar salsa verde
2 big cans green chilies
salt and pepper
square box of chicken broth (size?)
She browns the pork and onions then adds 1/8 cup flour to the pan. Then stir in the broth and little bit of water to wash out your tomato cans. Add remaining ingredients.
Tiff: That's all I know. I haven't tried this myself yet - just know it was really good. It was a little spicy but that could be controlled with how much of a jalepeno you add to the chili.
Thursday, June 10, 2010
Southwest Chipotle Burgers
 This recipe comes from Our Best Bites. Very delicious, we just had them for dinner tonight! Here are their step by step instructions with photos.
1 1/2 lb ground chuck or ground sirloin (I used hamburger instead)
1-1/2 chipotle peppers canned in adobo sauce
1 1/2 T adobo sauce (from the chipotle chili can)
1/4 C grated onion
1 t garlic powder
1/2 t cumin
1 1/2 t kosher salt
1/4 t pepper
Chipotle-lime Mayo
1/2 C Mayo
2 t lime juice
1 1/2 t adobo sauce (from the canned chipotle chilis)
2T chopped fresh cilantro
4-6 good quality buns
1 tomato
1-2 avocado
lettuce
optional: jack, cotija, or queso fresco cheese
Place mayo, adobo sauce, lime juice and cilantro in a small bowl. Now this is the hard part. Stir it all together. Do you like how I included 3 pictures for this process? Don't ask me why I did that... Cover it and set in the fridge. You can make this part up to a day ahead of time if you want to. And it's seriously so good I could dip anything in it. Fries, chips, my fingers... I actually usually double it so I can serve extra on the table.
Now place the beef in a bowl and gently crumble with your fingers. Add the chipotle peppers, adobo sauce, grated onion, garlic powder, cumin, kosher salt, and pepper. Use your hands (yes, your hands!) to gently mix things together. If you go crazy and over-work ground beef it gets a yucky texture. Just mix it enough to distribute the ingredients and call it good.
Divide into 4 patties (or 6 little ones) and place on a preheated grill, indoor grill pan, or skillet.If you want to top with cheese, do so in the last few minutes of grilling. I'd use jack (not pepperjack), cotija, or even some queso fresco. While the burgers are cooking, toast buns and spread chipotle-lime sauce generously on each side of each bun.
When the burgers are done to your liking let them stand for 5 minutes off the grill/pan and then pop onto your prepared buns. Top with tomato slices, avocado slices, and a crisp piece of lettuce. If you made extra sauce, serve it on the table so people can slather it on every bite. Just wait until you sink your teeth into this baby!
Tiff's Tips: You can also make these with ground beef. Make a double batch and freeze some for later!
Friday, February 12, 2010
Honey Lime Enchiladas
 I made this recipe for my family and we all enjoyed (everyone except Vivian) it. It's a nice twist from the usual recipe. It's a keeper! I found this recipe at Let's Grow Together.
1/3 cup honey
1/4 cup lime juice (about 2 large limes)
1 to 1 1/2 teaspoons chili powder
1/2 teaspoon garlic powder
1 lb boneless skinless chicken breasts (about 2 large breasts), cooked and shredded
12 corn tortillas
2 cups of Mexican cheese blend, shredded
1 14-oz can of green enchilada sauce
1/2 to 3/4 cup of heavy cream
nonstick cooking spray
Chopped cilantro, to garnish
Preheat oven to 350 degrees F. Place the cooked and shredded chicken in a medium sized bowl. Set aside. In a small bowl, place the honey, lime juice, chili powder or garlic powder. Whisk together thoroughly to combine. Pour this mixture over the chicken and cover with plastic wrap. Allow to marinate while you prepare the tortillas, 30 minutes or up to 1 hour, in the refrigerator.
Heat a large griddle till a drop of water skitters across (about 350 degrees F). Spray the surface with non-stick cooking spray or a oil it with a little bit of canola oil in between each round of tortillas. Heat tortillas about 20 seconds on each side till warm and flexible and some golden brown spots have appeared. Remove the tortillas from the griddle and keep them between a couple of paper towels until ready to use.
Spray the sides and bottom of a 9x13-inch baking dish lightly with cooking spray.
In a medium bowl combine the enchilada sauce and the heavy cream. Spread about 1/2 cup of the mixture in the bottom of the oiled baking dish.
Add a large spoonful (about 2 tablespoons) of the chicken mixture to the center of each tortilla in a line. Cover the chicken with a large tablespoon (or big pinch) of cheese, then roll the tortilla up from one side to make a rolled enchilada - it will be more of an over lap on the seam side that rolled tightly. Place the enchilada seam side down in the baking dish starting at one end with the long edge parallel to the longest side of the pan so that you end up with two columns of six enchiladas each.
Repeat with the remaining chicken, cheese and tortillas. You will use about 1 1/2 cups of the cheese for the filling and set the remainder aside for topping the enchiladas in the pan. Add the remaining marinade mixture to the enchilada sauce and cream mixture, if desired. Pour this mixture over the top of all the enchiladas. Sprinkle with the remaining cheese.
Bake the enchiladas for 30 to 35 minutes, until the cheese is melted and bubbly and starting to brown on top. Serve with sour cream, black beans, and rice or a green salad for a great meal.
(This would also work as a freezer meal).
Sunday, October 25, 2009
Buffalo Chicken Burgers

I found this recipe in our local newspaper. The recipe was submitted by Jennifer Joles. It is so easy to make that I'm excited to add it to my favorites.
1 lb. ground chicken breast
1/4 cup buffalo wing sauce, divided
1/2 cup finely chopped onion (I used less than 1/4 cup of dried onions)
1/4 cup chopped celery
1/4 cup plain dried bread crumbs (I used seasoned bread crumbs)
1/2 tsp. garlic salt
4 whole wheat hamburger buns
Blue Cheese crumbles (I didn't have this on hand...next time I might add blue cheese dressing)
Lettuce and tomato
Combine ground chicken, half of the buffalo wing sauce, onion, celery, bread crumbs and garlic salt. Form into 4 patties. Brush tops of burgers with some of the remaining buffalo sauce.
Place burgers on grill sauce-side down. Brush remaining sauce on top of burgers. Grill, turning once, until cooked through, about 10 minutes. Lightly toast buns during last minute of cooking.
Serve on whole wheat buns topped with crumbled blue cheese (or blue cheese dressing), lettuce, and tomato. For additional heat add a little buffalo wing sauce to your toasted bun.
I doubled the recipe and made an extra double batch for the freezer!
For kids who don't like buffalo wing sauce....just don't brush those burgers with the sauce or remove some of the chicken mixture before you add the sauce.
Saturday, October 24, 2009
Hawaiian Meatballs over Rice
Hawaiian Meatballs over Rice
This is a meal that I know everyone will love- and it only takes 30 minutes!!!
1 can pineapple chunks- drain, keep the juice for later
1 pound ground beef
1 cup oatmeal
1 whole egg
1/2 to 1 cup onion flakes or 1/2 to whole onion chopped- I use a lot of onion
1 tsp salt
1/4 tsp pumpkin pie spice
2 TB pineapple juice sauce (sauce recipe is below)
Pineapple juice Sauce:
1/3 cup pineapple juice- from pineapple
1/2 cup ketchup
1/3 cup brown sugar
first make the sauce- I triple the sauce recipe until I run out of pineapple juice. I like tons of sauce.
mix hamburger, onions, egg, oatmeal, salt, 3 TB pineapple juice sauce, and spices together- form balls out of hamburger mixture and stick a pineapple chunk in the middle of meatball. Fill up a 9x13 dish with meatballs until pineapple chunks are gone. Place plastic wrap over dish and microwave for 5 minutes. Turn meatballs, cover with plastic wrap and microwave for another 5 minutes. Add sauce and cook another 5 minutes. Done.
serve over rice.
Wednesday, October 21, 2009
Rasberry Glazed Chicken
From Tara's collection of freezer meals.
• 1 ½ lbs chicken
• ¾ cup raspberry jam
• ¾ cup ketchup
• 1/8 cup white vinegar
• 1 teaspoon Worcestershire sauce
• 1 teaspoon chili powder
• 1/8 teaspoon salt
Preparations
• In a small bowl, combine jam, ketchup, vinegar, Worcestershire, chili powder and salt, stirring well.
• Put chicken in a Ziploc bag or freezer container and pour sauce over top.
• Refrigerate for about 1 hr, turning every 15-20 minutes.
• Place container or bag in freezer.
To cook
• Thaw chicken in refrigerator overnight.
• Remove chicken from container or Ziploc and barbeque on the grill OR cook in the oven at 350F for 35-45 minutes (time will vary depending on chicken pieces you chose) until juices run clear and thermometer registers 165F. Great over rice.
Chicken Cordon Bleu
This is another recipe from Tara's freezer meal collection.
• 4 boneless, skinless chicken breasts
• 4 slices of ham, thinly sliced
• 4 slices Swiss cheese
• 2 cups seasoned bread crumbs
• ¼ cup grated parmesan
• 2 Tablespoon butter
Sauce Ingredients
• ½ cup canned cream of chicken soup
• ¼ cup sour cream
• ¼ cup milk
• 1 Tablespoon Dijon mustard
• 1 cup mushrooms, sliced
• 1 teaspoon minced garlic
• 1 teaspoon salt
• ½ teaspoons black pepper
• 2 Tablespoons fresh chopped flat leaf parsley (or 2 teaspoons dried)
Preparations
• Place each chicken breast on a cutting board between pieces of wax paper. Use a skillet to pound the chicken breast until it is ½” to ¼” thick.
• Arrange a slice of ham and Swiss cheese on top of each one.
• Roll each chicken breast tightly and secure with a toothpick.
• Coat with melted butter and roll in bread crumbs.
• Place in baking dish.
• In a bowl combine sauce ingredients. Mix thoroughly. Heat in sauce pan and pour over chicken just before serving (or serve in a gravy boat on the side).
To Bake
• Bake uncovered for 45 minutes at 375 degrees.
To Freeze
• Cover with plastic wrap and foil. Freeze for up to three months.
• Thaw in refrigerator before cooking as directed above.
• Combine sauce ingredients and freeze in small container. Heat sauce in microwave or on stovetop and pour over chicken just before serving.
Beef Enchiladas
From Tara's recipe collection of freezer meals.
Ingredients
• 2 pounds hamburger
• 1 package Lipton onion soup
• Corn tortillas
• Cheese – mozzarella & cheddar
Sauce Ingredients
• 1/3 cup shortening
• ½ cup flour
• 1 can Nalley’s Big Chunk Chili (no beans)
• 3 Tablespoons chili powder
• 1 can enchilada sauce
• 2 (8 oz) cans tomato sauce
• 1 can beef broth
• 1 package Lipton onion soup
• 2 Tablespoons sugar
• Salt
Preparation
• Brown hamburger and mix in Lipton onion soup mix. Take off heat and set aside.
In separate pot (on stove), melt shortening and add in flour, chili, and chili powder.
• Off heat add enchilada sauce, tomato sauce, beef broth, Lipton onion soup, sugar and salt (to taste).
• Put sauce back on heat and thicken.
Building the enchiladas
• Warm the tortillas in the microwave until they start to curl
• Pour in sauce in bottom of pan
• Take a tortilla – add meat & cheese. Roll and place in pan
• Continue rolling enchiladas until pan is full
• Pour sauce over top of enchiladas – completely covering all enchiladas
• Add cheese
To Bake
• Bake at 350 for 25-30 minutes
• If frozen, a bit longer
Recipe will make either 2 – 9X13 pans or 4 – 8X8 pans
Tuesday, April 14, 2009
Old-Time Beef Stew
Another freezer meal I tried and was good.
2 lbs beef cubes (stew meat)
1 T. oil
4 cups boiling water
1 T. lemon juice
1 t. Worcestershire sauce
1 clove garlic, minced
1 onion, sliced
1 T. salt
2 bay leaves
1/2 t. peper
1 t. sugar
1/2 t. paprika
dash of allspice
Serving day:
1 lbs carrots, chopped
3/4 potatoes, chopped
1-2 cups frozen peas
yields 6-8 servings
Cooking day instructions:
Brown meat in oil. Add rest of ingredients and cook 1-2 hours, until meat is tender. Freeze, using freeze bag method.
Serving day instructions:
Thaw completely and place stew in stockpot (I put in crock pot). Add vegetables and simmer 2-3 hours, until vegetables are tender. If desired, some of the liquid may be thickened with flour and poured over the meat and vegetables (I did this and it was yummy!)
Gooey Caramel Cinnamon Rolls
New, tried & true recipe from my freezer recipe book. This turned out yummy...so I would make it and freeze it in the future!
Dough:
3 1/2 cups flour
1 package active dry yeast
1 1/2 cups milk
1/2 cup milk
1/4 cup sugar
1/4 cup shortening
1 t. salt
1 egg
Filling:
1/2 cup melted butter
1/2 cup brown sugar or sugar
2 t. ground cinnamon
Carmel topping:
1 cup brown sugar
1/2 cup butter
2 T. light corn syrup
1/2 cup or more chopped pecans (optional)
Recipe yields 2 - 2 1/2 dozen rolls; two 8x8 or 9x9 pans
Cooking day instructions:
In a mixing bowl, combine 1 1/2 cups flour and the yeast. In a medium saucepan, heat milk, sugar, shortening, and salt just until warm (115 - 120 degree), stirring constantly until shortening almost melts. Add to dry mixture; add egg. Beat a low speed with electric mixer for 30 seconds, scraping bowl. Beat 3 minutes at high speed. By hand or with mixer on low speed, stir in remaining flour to make a soft dough. Shape into a ball. Place in lightly greased bowl,turning once to grease surface. Cover and let rise in warm place until dough doubles in size (approx 1 1/2 - 2 hours)
Meanwhile, blend filling ingredients together in a bowl. Set aside.
Prepare caramel topping: In a medium saucepan, mix the brown sugar, butter, and corn syrup. Heat slowly, stirring often. Add pecans, if desired.
When dough has risen, punch down and turn onto a floured surface. Cover and let rest for 10 minutes. Divide dough in half and roll our one piece into a 16 x 8 rectangle. Spread half of filling mixture over entire surface. Roll up jelly-roll style, starting with long edge; seal edges by pinching together. Cut in 1 1/2-inch slices. Repeat with other half of dough.
Divide caramel topping into each pan. Pace rolls over mixture. Seal well, label and freeze. If serving rolls that day, let rise in warm place until doubles in size, 30-45 minutes.
Serving day instructions:
Be sure to remove outer wrap from cinnamon rolls while still frozen, thaw and let rixe in warm place until doubled in size. Bake at 375 degrees about 20 minutes. Cool 2-3 minutes, then invert onto a plate or tray and remove pan.
Monday, March 16, 2009
Sweet and Sour Chicken
This is a family favorite recipe and a great freezer recipe.
Ingredients
• 2-3 lbs raw chicken, cut into cubes
Sauce:
• ¾ cup sugar
• ½ cup vinegar
• 1 Tablespoon soy sauce
• ½ cup water
• 1 chicken bouillon cube
• 3 ½ Tablespoons ketchup
• 1 Tablespoon cornstarch (for sauce, you will need extra see below)
Preparations
• Dip chicken pieces in cornstarch and then in egg. Then brown chicken pieces in non-stick frying pan (outside will brown slightly and inside will be raw).
• Put chicken pieces in 9 X 13 baking dish.
• Boil sauce ingredients (mix in cornstarch first) for 1 minute and then pour over chicken.
To cook
• Bake at 325 degrees for 1 hour. Spoon sauce over chicken once during baking time. (If you are baking this after it has been in the freezer - plan on longer for baking time.)
Serve over rice. The sauce is really good – I always double the sauce recipe so you can spoon it over your rice.
Tuesday, May 13, 2008
Angel Food Cake Roll

This is actually Marne's recipe. It's very easy to make and stores well in the freezer!
Mix an angel food cake according the the package directions. Spread the cake batter on top of a wax paper lined large cookie sheet (with sides) and bake until lightly golden brown. I think it was about 18-20 minutes - not sure. After it's baked, flip the pan onto a large tea towel and then peel off the wax paper and then roll the cake up with the towel and let it cool.
After it is cool, carefully unwrap the cake and then spread the filling on top of the cake. Then roll it back up. Wrap the cake roll in saran wrap (I wrap mine really good - a couple times) and freeze it until your ready to eat it! I usually let it sit out a few minutes before slicing it - you can serve it frozen cold or partially thawed.
Filling:
1- 8 ounce strawberry yogurt
1 small pkg. of sugar free vanilla pudding mix
2 cups thawed Cool Whip
Chopped fresh strawberries - however much you want (optional)
3 drops red food coloring - to make it a pretty pink
Subscribe to:
Posts (Atom)